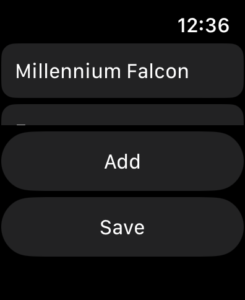
I felt that using the Toolbar to place the buttons on the view was not particularly the best approach. I then found that watchOS doesn’t allow for two buttons in the toolbar. Whichever button is placed first in the code will appear, but no further ones. Therefore, I placed them after the List:

As you can see from the screenshot, the two buttons use up too much screen space in this configuration. I tried embedding the list and buttons into a scrollView, but that meant the list no longer showed. This is because a list is a ScrollView and having nested ScrollViews doesn’t appear to be a good idea in SwiftUI.
I then decided to move the List up a level and iterate over the array using a ForEach loop. This allowed me to place the Button structs inside the list so that they appeared in the last two rows.
NavigationView {
    List {
        ForEach(ships, id: \.self) { ship in
                Text(ship.name ?? "Unknown name")
            }

        Button {
            let ship1 = Ship(context: moc)
            ship1.name = "Enterprise"
            ship1.universe = "Star Trek"
            let ship2 = Ship(context: moc)
            ship2.name = "Voyager"
            ship2.universe = "Star Trek"
            let ship3 = Ship(context: moc)
            ship3.name = "Millennium Falcon"
            ship3.universe = "Star Wars"
            let ship4 = Ship(context: moc)
            ship4.name = "Executor"
            ship4.universe = "Star Wars"
        } label: {
            Text("Add")
        }
            .listRowBackground(
                RoundedRectangle(cornerRadius: 10)
                    .fill(.blue)
            )
        Button {
                if moc.hasChanges {
                    try? moc.save()
                }
            } label: {
                Text("Save")
            }
        .listRowBackground(
            RoundedRectangle(cornerRadius: 10)
                .fill(.green)
            )

    }
    .navigationTitle("Ships")
    .navigationBarTitleDisplayMode(.inline)

}
I then used the .listRowBackground modifier to make the rows appear more like action buttons.
Overall the App works quite well on watchOS and it is great to be able to use CoreData without any changes.

Leave a Reply